|
5 Elements of Great Chromakey This lesson will dive into the necessary elements you need to pull off a great chromakey. Space The first element in pulling off a key is the type of space you have to work with. Your space will determine what kind of chromakey shot is possible. When shooting against a greenscreen or a blue screen, you’ll want to pull you subject away from the background far enough so that shadows don’t fall on the screen and you’ll want to minimize the reflection of the screen on your subject. Get subject away from screen to minimize shadows and screen spill on subject. 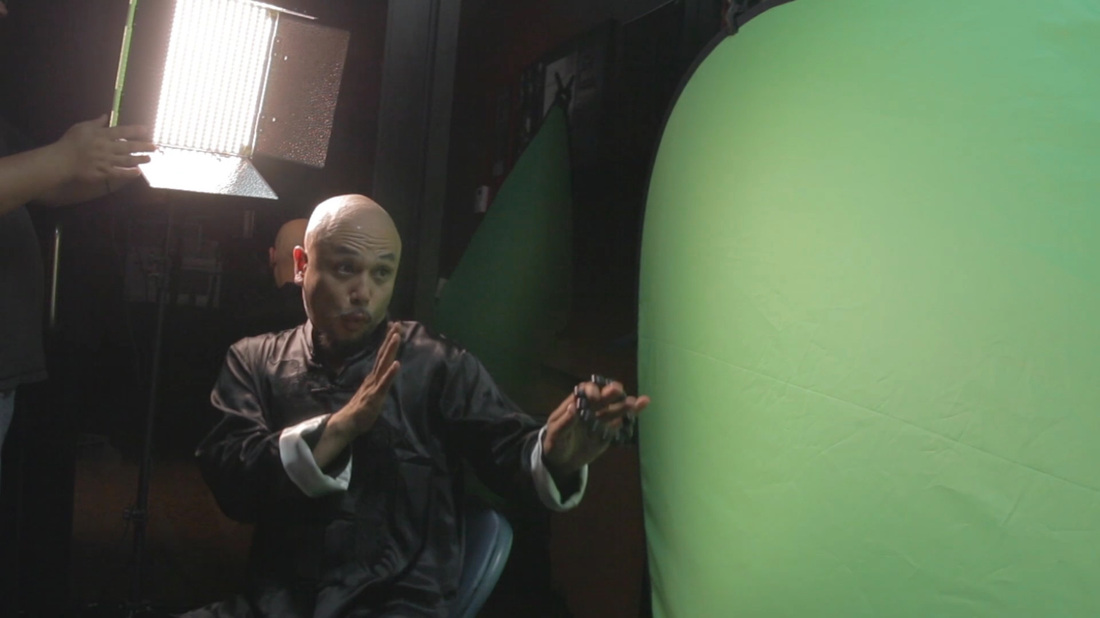 With smaller spaces you should be able to pull off a reasonable talking head shot – that’s where the shot is just the head and shoulders of the subject speaking. For a full body shot, you’re not only going to need a larger space for a screen, but some distance to place the camera so that your subject looks natural and isn’t distorted by a wide angle lens. 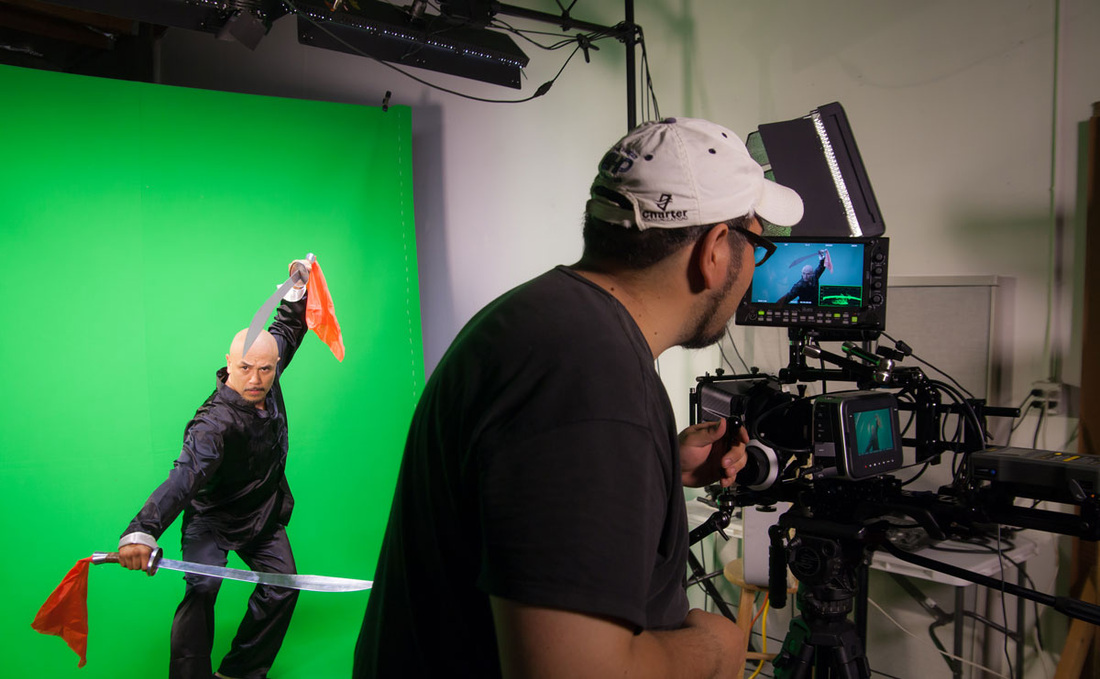 Shooting outdoors is also a possibility especially for certain shots, just keep in mind you’ll have to deal with all the issues that come shooting outdoors including wind, noise, and shadows. 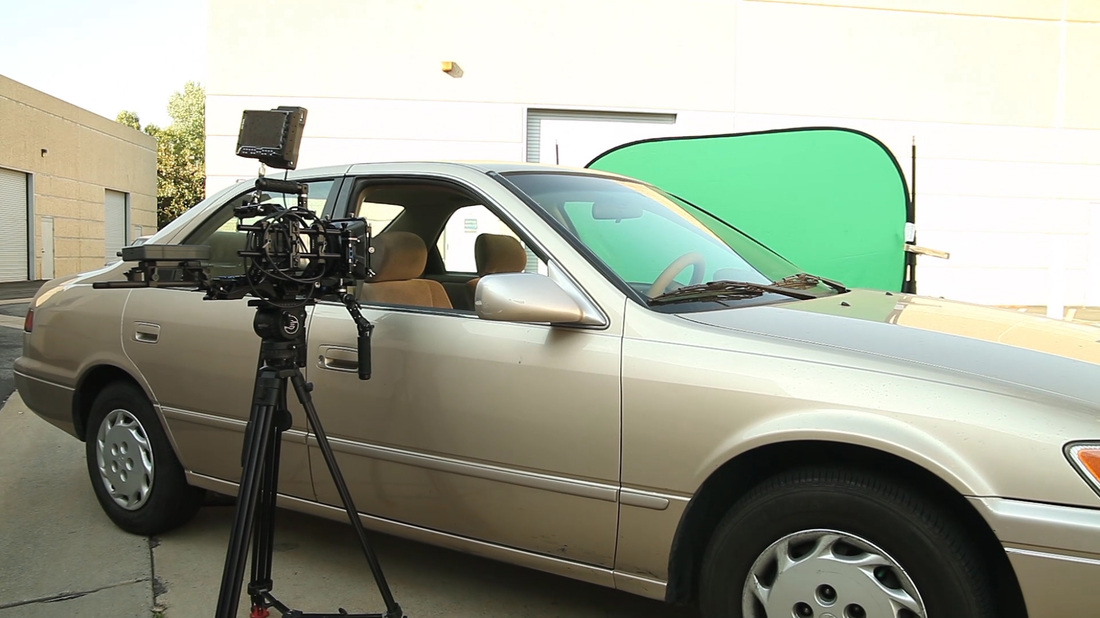 The Screen The first question you’re going to ask is green or blue? Blue screen was a traditional color in the film days and is still used today for many productions, but green is the preferred color for digital keying. Why? Because many digital cameras use a Bayer pattern of Red Green Blue photosites where there are twice as many green photosites as there are red and blue. This makes digital cameras much more sensitive to green coloring. Green screen also requires a lot less light than blue screen and is less likely to match the clothing of your actors. Still you may want to use blue screen in certain cases – say you’re shooting a green monster. In fact on the Sam Raimi’s Spiderman, The Green Goblin had to be photographed on a bluescreen because the suit would have been lost on a greenscreen. Spiderman on the other hand had to be shot on a Greenscreen, because his suit was red and blue.. When it comes to the material of your screen you have several options. The first is to paint your background using a chroma key paint. This is the most permanent although labor intensive way to create a chromakey background though certainly necessary if you are planning on installing a cyclorama. Sample shot of aGreen Cyclorma also called an “infinity cyc” 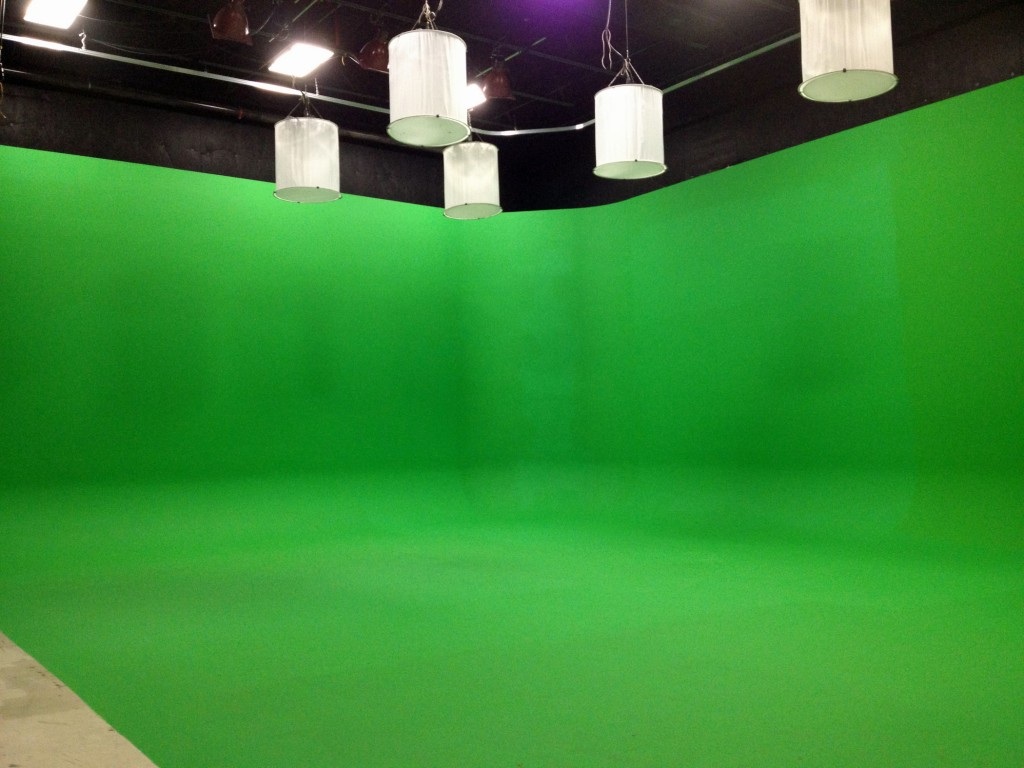 The other option is to hang your screen You’ll need background stands and clamps to hang your screen on. The screen itself can be made out of paper, or muslin background clothe, but I prefer foam backed cloth because it scatters the light more evenly so you can avoid hotspots and the foam keeps the screen from wrinkling when not in use. For small setups, foldable chorma key screens are available. These kits are really handy for quick portable setups or outdoor use and built in frame keeps the screen from getting too wrinkled. Lighting When lighting for chroma key you have to think of lighting first for the screen itself and then for the subject. In tight situations you can combine the lighting but you could end up with shadows on your screen and that will make for a much more difficult task of pulling a good key. Start by focusing on getting a clean and even light on your screen without your subject. Here I’m using 2 ikan IDMX1500 dual color fixtures – part of the ikan 5 piece dual color chroma key kit. These are hung in front of the screen using a truss system. These are awesome LED lights that put out a lot of soft even light which is an absolute must properly lighting a greenscreen. Now if you’re an avid DIYer you may try to use long fluorescent tubes to light the screen. Another DIY option, is the Hollywood strip lighting fixture – this one I found on a street curb being thrown out – and it made a nice shadowless screen light. 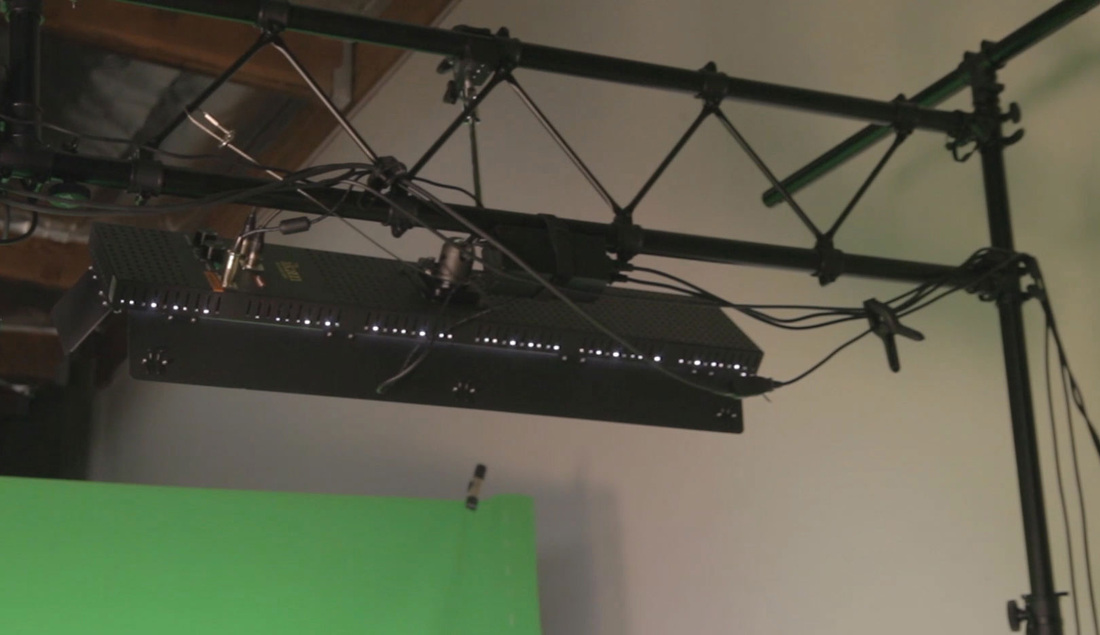 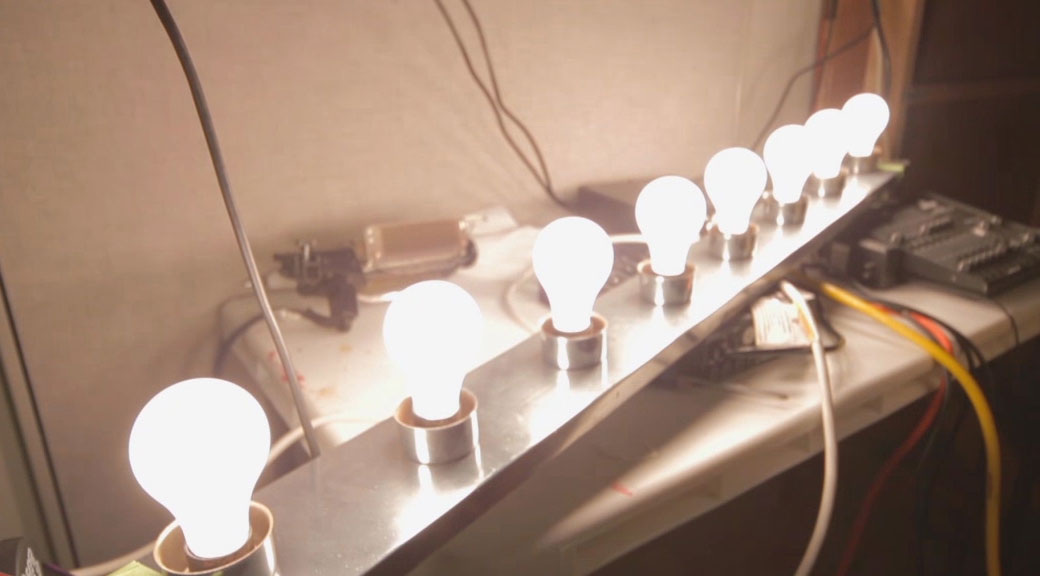 To check to see the quality of our lighting on the greenscreen, I’m using the ikan MD7’s built-in waveform monitor. Waveform shows a relatively tight band – an overall even lighting on the screen. 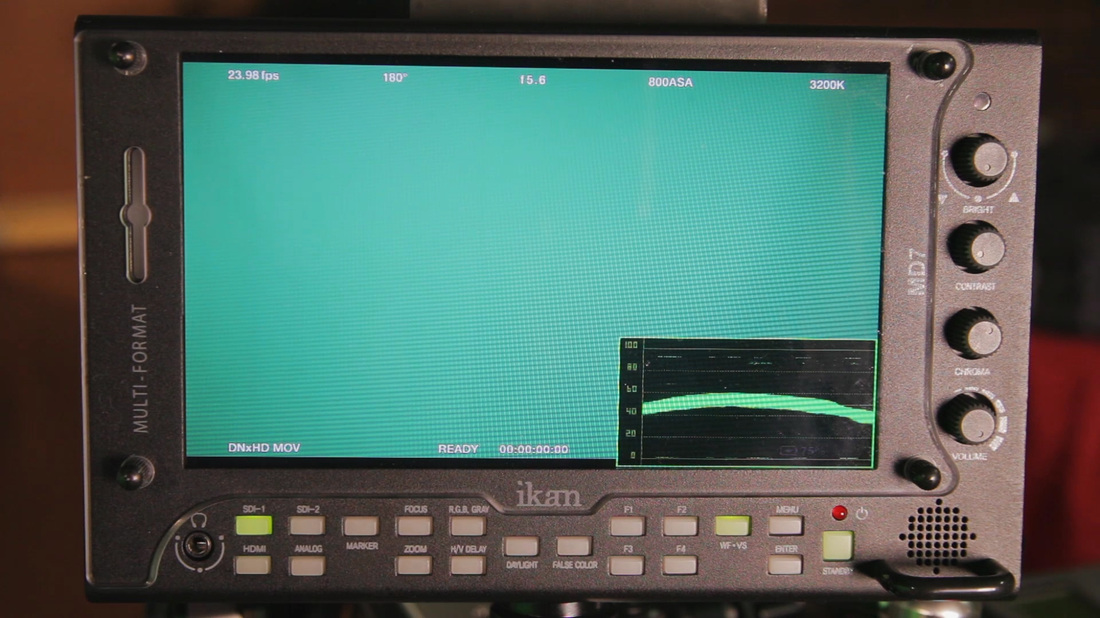 Notice the tight band.. This means that are screen is evenly lit and there’s not much variation on the screen itself. You want to get this band as tight as possible, not slanted or have spikes which are hotspots.. If you can’t get your hands on a waveform monitor, you can use your camera’s zebras settings. Zebras tell you what part of your image is overexposed, if you lit your screen properly you should see the entire screen turning into zebra stripes at once as you open your iris to over expose the screen. Once we have a well lit screen it’s time to put our subject in place and work on the subject’s lighting. Keep in mind the final composition and try to light your subject that will match the scene you’re attempting to composite.  Here I’m using the ikan IB1000 LED lights – part of their chroma key kit. These lights can be set to 3200k which will match great with the tungsten lights I already own. Just take care when lighting your subject to avoid casting shadows on your screen. The Camera When I first started experimenting with greenscreen, I was working with DV in standard definition. You had to be exact in order to get an acceptable key, and even then there were some funky artifacts. But I’m happy to say that with HD, getting a reasonably acceptable key is much easier because the pixels are so much smaller. But the type of compression can be a detriment to quality greenscreen. Most consumer cameras use a 4:2:0 compression for handling color – I talk more what color compression is in the lesson on Non-Linear editing if you want a refresher. 4:2:0 throws away a lot of color data – data that can be very useful for achieving a quality key. 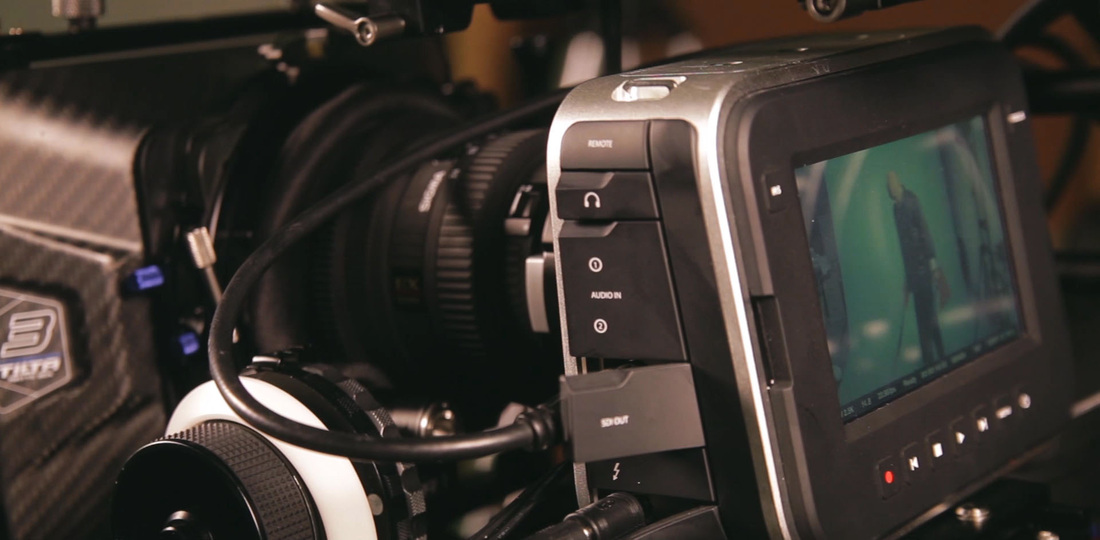 In this demonstration, I’m using the Blackmagic Cinema Camera decked out with ikan’s Tilta Rig. The Blackmagic Cinema Camera is capable of recording in 4:2:2 compression using ProRes or DNxHD formats or even recording 4:4:4 uncompressed 12 bit raw. My tests have shown that the compressed 4:2:2 is pretty good for pulling a good chroma key but the RAW is simply unbeatable in terms of ease and quality. If you want the best chroma key, by all means shoot RAW – just know that it is expensive in terms of the amount of memory it eats up. I’m not saying you can’t pull a decent key using anything less than 4:2:2 color compression or RAW as in the Blackmagic Cinema Camera, but a camera like this with it’s compression or lack thereof sure makes a the key a heck of a lot easier. Post Production Most of the basic keyers you find inside NLEs behave like hardware chroma keyers in that you’ll most likely be let down by the results. But there are a lot of professional keying software solutions available out there that can help you pull pretty good keys even out of so-so footage. My favorite. happens to be one that comes bundled inside of Adobe After Effects called “Keylight” made by The Foundry. This plugin is incredibly robust with all kinds of features like matte choking, spill removal, de-spotting- and even masks that you can apply to fix little chroma key mistakes here and there. Plus After Effects is just a good platform to be working doing your compositing in the first place. Keylight is also available for purchase for other editing platforms.  Now if you can’t pull a perfect key off the entire frame – don’t worry as there is a technique called garbage matting. Using After Effects, you can create a rough mask around your subject and throw away all the other junk in your frame thats unimportant. This is a great way to work in smaller spaces – just make sure you subject does cross into the garbage matte
Once you have a good clean key, it’s a matter of compositing the subject into your background plate adjusting the color to match, and compositing foreground elements to really sell the effect. By considering your working space, using a quality screen, lighting it evenly, using a camera with as little compression as you can get, and finally using a good software keyer, you should be able to pull off a great key. Good chroma keying is a skill, and it will take a little practice, but the reward for your patience and experimentation can be quite liberating. – Another tool for you use in your quest to make something great. Original Source Quizzes 5 Elements of a Great Chromakey Quiz
0 Comments
A matte painting is a painted representation of a landscape, set, or distant location that allows filmmakers to create the illusion of an environment that is nonexistent in real life or would otherwise be too expensive or impossible to build or visit. Historically, matte painters and film technicians have used various techniques to combine a matte-painted image with live-action footage. At its best, depending on the skill levels of the artists and technicians, the effect is "seamless" and creates environments that would otherwise be impossible to film. In the scenes the painting part is static and movements are integrated on it.
Traditionally, matte paintings were made by artists using paints or pastels on large sheets of glass for integrating with the live-action footage.[1] The first known matte painting shot was made in 1907 by Norman Dawn (ASC), who improvised the crumbling California Missions by painting them on glass for the movie Missions of California.[2] Notable traditional matte-painting shots include Dorothy’s approach to the Emerald City in The Wizard of Oz, Charles Foster Kane’s Xanadu in Citizen Kane, and the seemingly bottomless tractor-beam set of Star Wars Episode IV: A New Hope. The first Star Wars documentary ever made (The Making of Star Wars, directed by Robert Guenette in 1977 for television) mentioned the technique used for the tractor beam scene as being a glass painting.[3] By the mid-1980s, advancements in computer graphics programs allowed matte painters to work in the digital realm. The first digital matte shot was created by painter Chris Evans in 1985 for Young Sherlock Holmes for a scene featuring a computer-graphics (CG) animation of a knight leaping from a stained-glass window. Evans first painted the window in acrylics, then scanned the painting into LucasFilm’s Pixar system for further digital manipulation. The computer animation (another first) blended perfectly with the digital matte, something a traditional matte painting could not have accomplished.[4] New technologies Throughout the 1990s, traditional matte paintings were still in use, but more often in conjunction with digital compositing. Die Hard 2: Die Harder (1990) was the first film to use digitally composited live-action footage with a traditional glass matte painting that had been photographed and scanned into a computer. It was for the last scene, which took place on an airport runway.[5] By the end of the decade, the time of hand-painted matte paintings was drawing to a close, although as late as 1997 some traditional paintings were still being made, notably Chris Evans’ painting of the Carpathia rescue ship in James Cameron’s Titanic.[6] Paint has now been superseded by digital images created using photo references, 3-D models, and drawing tablets. Matte painters combine their digitally matte painted textures within computer-generated 3-D environments, allowing for 3-D camera movement.[7] Lighting algorithms used to simulate lighting sources expanded in scope in 1995, when radiosity rendering was applied to film for the first time in Martin Scorsese’s Casino. Matte World Digital collaborated with LightScape to simulate the indirect bounce-light effect[8] of millions of neon lights of the 70s-era Las Vegas strip.[9] Lower computer processing times continue to alter and expand matte painting technologies and techniques. Significant uses
Important traditional matte painters and technicians Here are some online video tutorials given by Ms Kit in the first wk lecture. They showed the use and features of Primatte5 in Nuke 7.0 for solving different problems in different situations.
ikan is an award-winning designer, manufacturer and distributor of video and film production support that provides media professionals with simplicity in design, affordability and unmatched value. http://BlackMagicDesign.com Creating the world's highest quality solutions for the feature film, post production and television broadcast industries.
video transcript 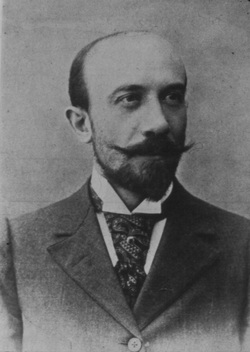 Hollywood’s History of Faking It | The Evolution of Greenscreen Compositing Today we’ll explore Hollywood’s history of visual trickery with the backstory of modern greenscreen compositing. The Magician’s Medium With cameras and computers everywhere in our modern world, it’s easy to forget that the very first motion pictures were, themselves, essentially a special effect. It’s here at the beginning of filmmaking that we’ll start our journey: the close of the 19th century with one of the world’s first prolific filmmakers – a man who spent his life studying the art of illusion – Georges Méliès. Georges Méliès In his 1898 film Four Heads are better than one, (Un Homme De Tête) Méliès employs a visual trick that is the rudimentary beginnings of what we now think of as greenscreen compositing. The use of mattes for multiple exposures. Compositing is a technique combining different shots and elements into one image. The matte shot was the first compositing techniques employed by early filmmakers such as Melies. In his film, Melies would black out parts of the frame using a piece of glass with some black paint. This “matte” made it so no light would reach the film so it wouldn’t get exposed. Then Melies would rewind the film and this time matted out of everything else and expose only the part of the frame that was under the matte earlier. The resulting double exposure could combine two or more different shots into one frame all done inside the camera. This matte technique was used again on Edwin S. Porter’s 1903 The Great Train Robbery but this time not as magic trick but as a means to create a larger more realistic world Notice the train moving outside the window of the train station – also the open door of the mail car with the scenery in the background. Both of these shots were done using mattes and double exposure. Now the fair question to ask here is why didn’t they just shoot it in a real train station or a real train car? The answer is it was technically impossible at the time. Early orthochromatic film needed a lot of light and the technology for efficient electrical lighting for film was still a decade or two away. That’s not even considering the inherent exposure problems of shooting an interior scene with a window in the shot. Even modern day cameras have trouble with the brightness differences between interiors and exteriors. In order to make film behave they way we experience the world, visual trickery had to be done. 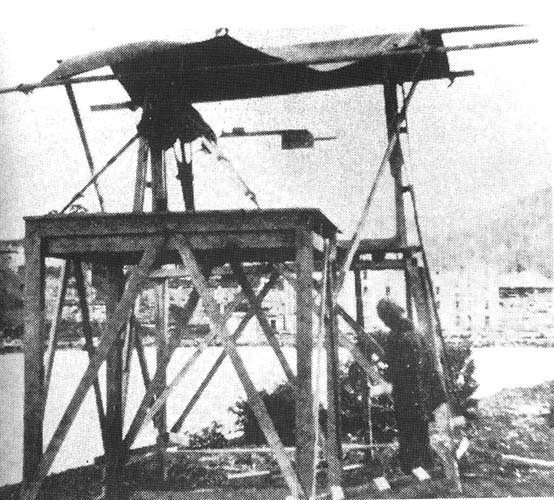  As film grew up in the 1900s and 1910s more techniques for augmenting sets and creating false realities would be developed. The Glass shot was a technique of painting elements on a piece of glass and placing that glass between the subject and the camera – a sort of real world compositing which was refined by early filmmaker Norman Dawn, using it to augment sets making them look much bigger and more elaborate without the costs of construction. Pioneering Filmmaker: Norman Dawn But the problem with the glass shot was the paintings had to be ready on set. Norman Dawn solved this problem by painting the glass black and treating the shot like a matte shot. The matted film would be transfer to a second camera where matte artists could take their time creating the matte paintings. This matte painting concept continued seeing use in the golden era of Hollywood and continues with us even in our digital world.  James Cameron working on Glass Shot for “Escape to New York” (1981) The “Black” Screen The problem with mattes is the camera had to stay perfectly still and no action could cross the matte line – the “hopefully” invisible line between the live action and the matte painting. This is where the traveling matte came into place. The process patented by Frank Williams in 1918 and demonstrated here in F.W. Murnau’s 1927 film“Sunrise” – was a black matting process which photographed subjects against a pure black background. The film would then be copied to increasingly high contrast negatives until a black and white silhouette emerged. This black and white silhouette was used as the matte – called a traveling matte because it moved throughout the frame. 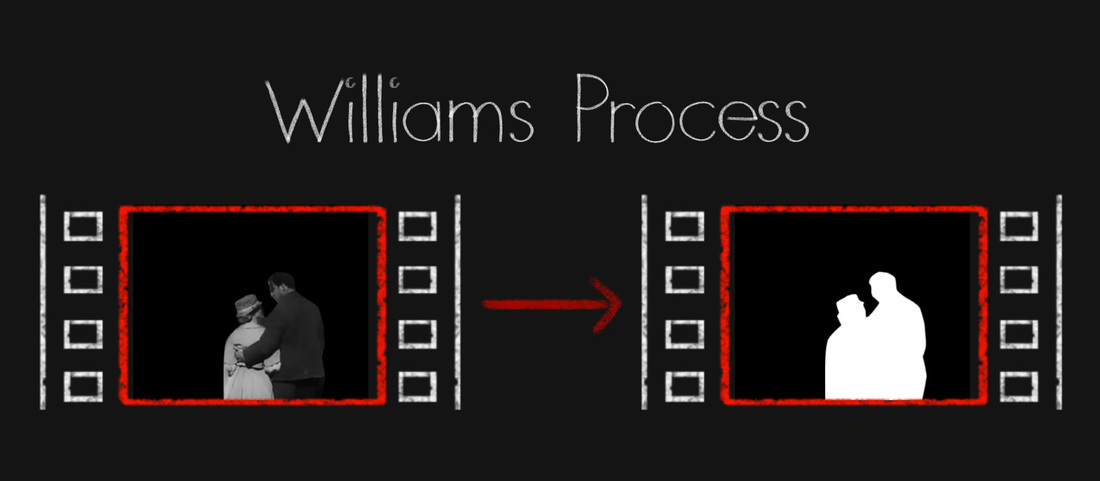 This “black back matte” effect which was called the Williams Process was used quite famously by John P. Fulton in 1933 for the film “The Invisble Man”. The shots where the invisible man was taking off his clothes were accomplished by photographing actor Claude Rains wearing a full black velvet suit standing against a black background. This effect was so memorable and startling it was used on follow up sequels even after more effective processes came along. Blue Screen The Williams Process had some issues – for one, any shadows on the subject would be lost in the traveling matte. An alternative came about in 1925, invented C. Dodge Dunning which would eventually be called the Dunning Process. 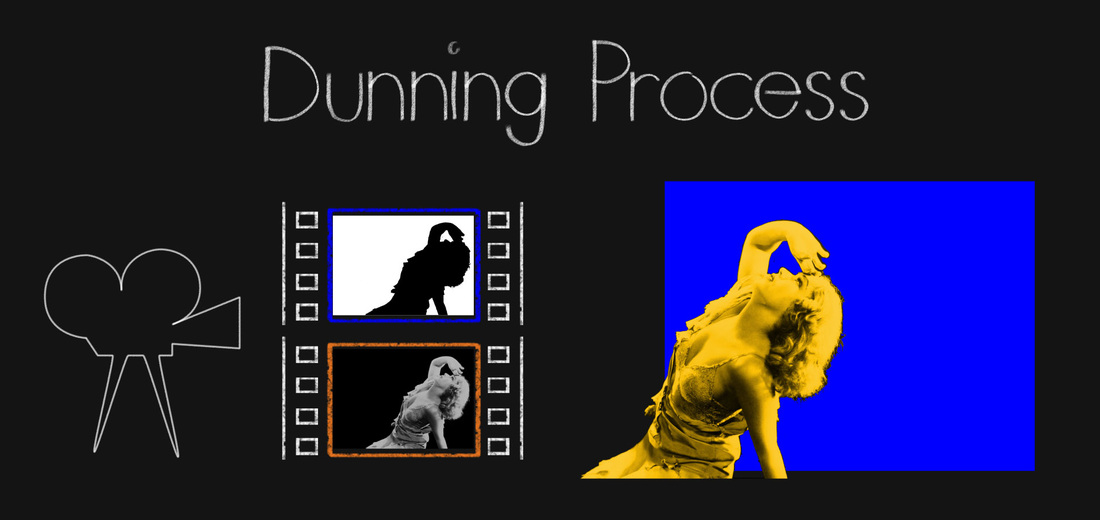 This process used colored lights, lighting a background screen blue and the foreground subject in yellow. Using dyes and filters, the blue and yellow light could be split apart to create traveling mattes. The Dunning Process would first see use on King Kong in 1933. Rear-Projection in 1933's King Kong The problem with the Dunning Process was it only worked with black and white film. Color Film needed a new technique and it would come in 1940 by special effects artist Larry Butler in the Thief of Bagdad. Using the three strip technicolor process, Butler shot the subject against a blue background. Blue was used because it was the farthest away from skin tones and the blue film stock had the smallest grain. Taking the blue separation from the three technicolor negatives, Butler was able to create a silhouette matte just like with Williams process. Then, using an optical printer, a relatively new invention at the time that could combine multiple film strips into one, Butler would first remove the blue background from the foreground plate and, using the negative of the travelling matte, remove the foreground space from the background plate and then finally combining both foreground and background plates together. This bluescreen technique won an Academy award for Best Special Effects for Lawrence Butler in 1940 but it was not without its inherent problems. Firstly the process was extremely time consuming as it involved several steps with an optical printer. Secondly, it still had some edge issues where a thin blue line was almost always visible in the shots. It also couldn’t handle any fine details like hair or smoke or motion blur. Despite these limitations, the blue screen process was used extensively including in such blockbusters as The Ten Commandments in 1956: 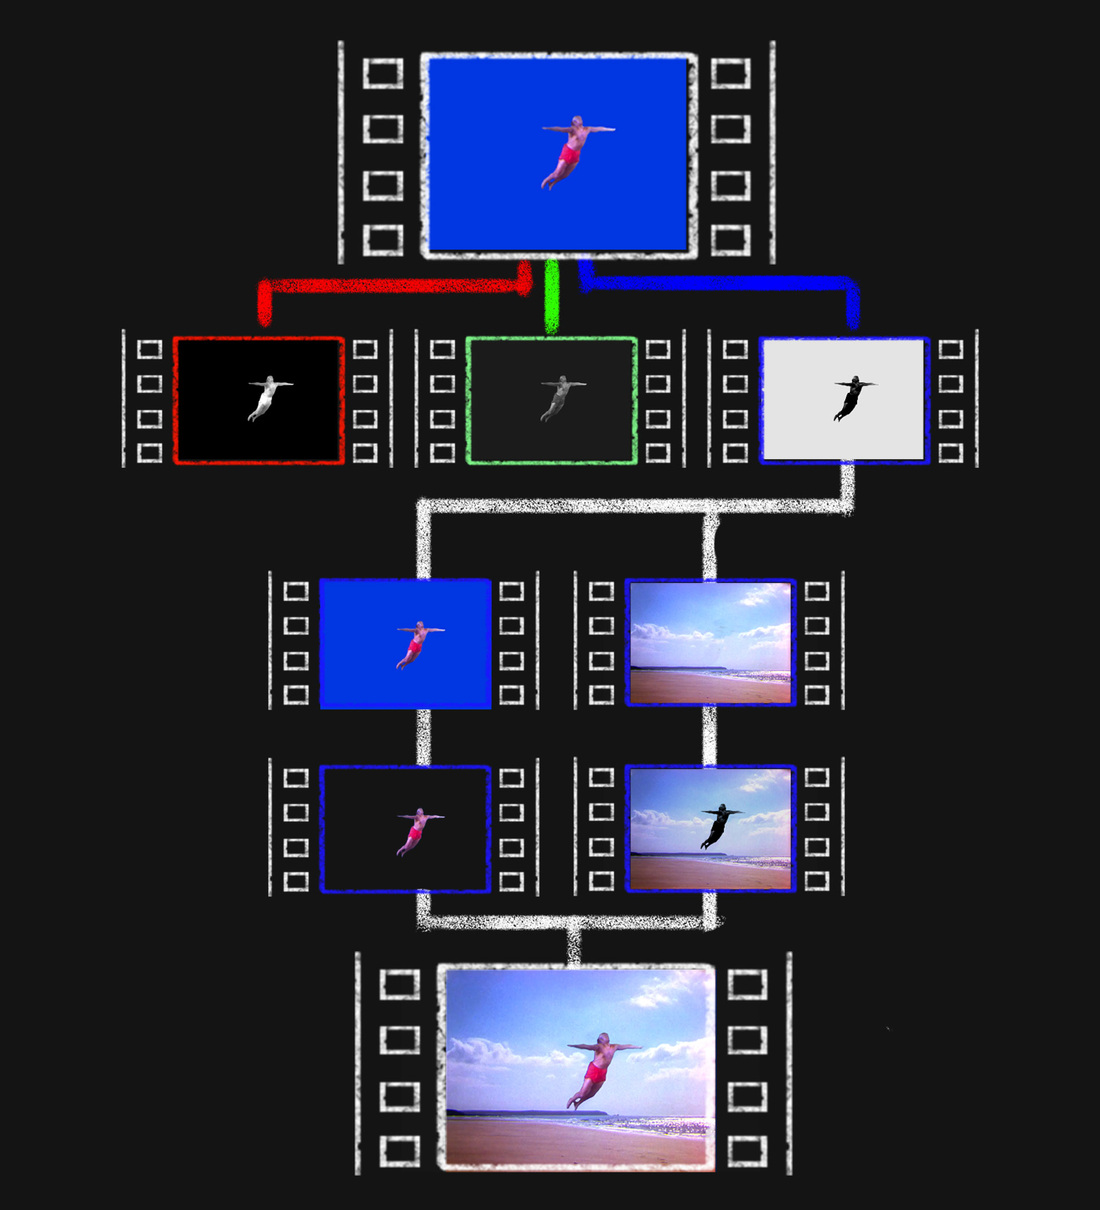  “Yellow” Screen Hollywood kept experimenting with other variations on the bluescreen process including the ultraviolet matte as used in The Old Man and The Sea. But the real challenger to blue screen was created in the late 50s and credited to one of the giants in world of compositing Petro Vlahos. Petro Vlahos Developed by Vlahos in the mid 50s and used extensively by the Walt Disney Studios in the 60s and 70s: The Sodium vapor process used actors, who were lit normally, standing in front of a white screen which was lit by powerful sodium vapor lights – those are the orange lights you see on street corners. Sodium vapor emits light in a very specific wavelength – averaging 589.3 nanometers – and nothing else. Using a specially coated prism in an old three strip Technicolor camera, the very specific wavelength of the sodium vapor light was split off and captured on special black and white film – automatically creating the black and white traveling matte. The remaining light would be captured by regular three strip Technicolor Film which was relatively unaffected by the yellow/orange sodium vapor lights. 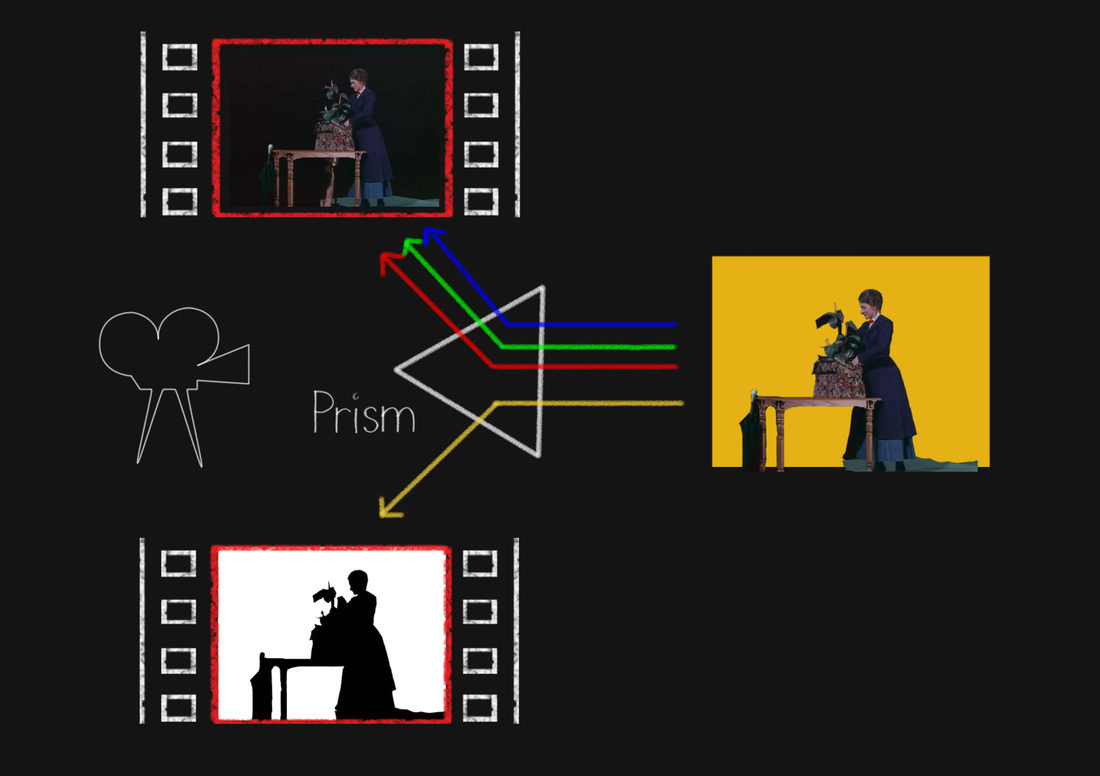 This technique produced some of the best travelling mattes of the time and was used by Disney first on film The Parent Trap and then The Absent Minded Professor both in 1961. Mary Poppins in 1964 demonstrated the capability of the sodium vapor process winning an academy award for best special effects. 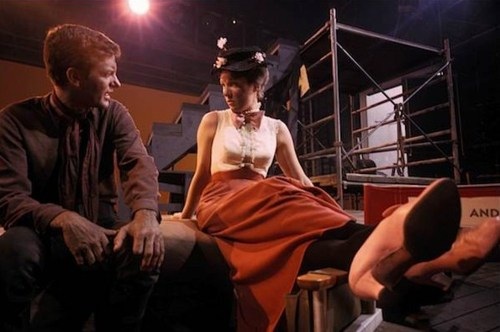 There was just one problem. Only One Sodium Vapor prism was ever made so there was only one camera that was capable of this process. Disney owned the camera and they didn’t let it rent for cheap. Revenge of the Blue Screen In the late 50s, When MGM was ready to produce Ben Hur in the MGM Camera 65 format (a 65mm film process) they turned to Petro Vlahos, the inventor of the sodium vapor process for help on the compositing. They didn’t want the problems that Ten Commandments had with bluescreen but The sodium vapor process wouldn’t work as it prism it used was been made for 35mm film, not 65mm. So Vlahos was asked to see if he could do something about trying to improve the bluescreen process. After six months of hard work, Vlahos had a discovery. And this is where it gets pretty complicated.. 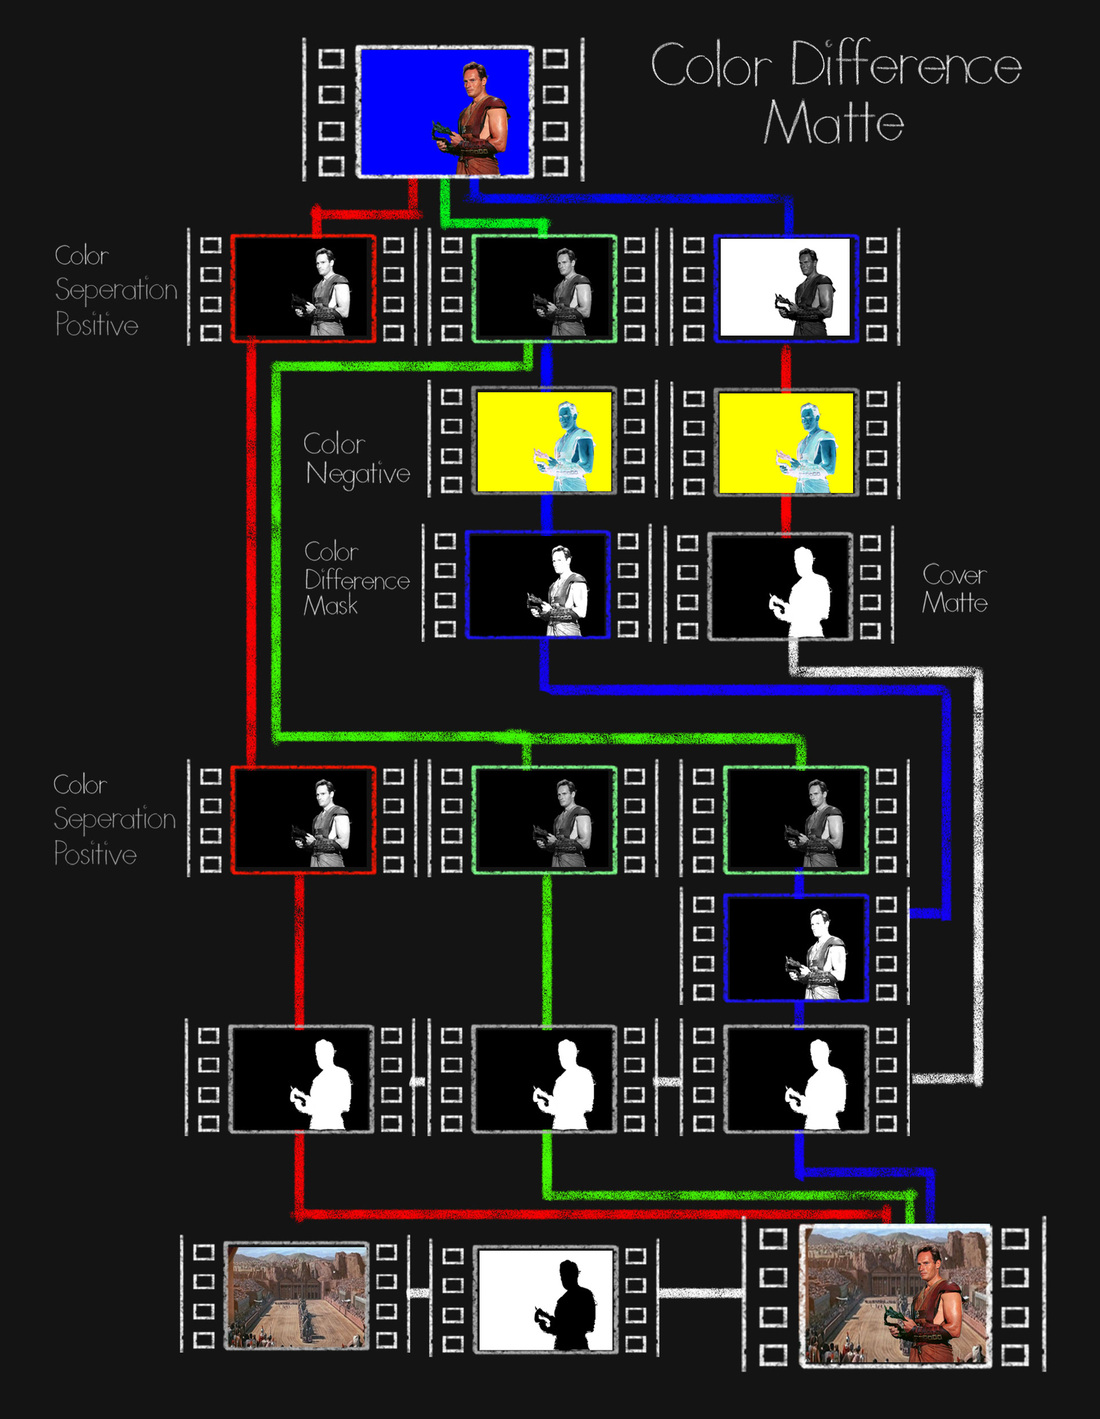 Most colors that aren’t purely green or purely blue have about equal amounts of blue and green in them. So when creating a matte from bluescreen, Vlahos used a Green Cancellation separation (or positive), ran it though with the original color negative exposing both pieces of film together under a blue to light to create a “blue difference matte”. This matte was clear where the blue and green were the same – Then the blue separation positive was combined with the original negative and exposed under red light to get a cover matte. This cover matte was applied back to the original color separations except that the blue separation was replaced with a composite of the green and the green difference mask – essentially a synthetic blue separation. This complicated process required 12 film elements to get from the composite negative to the composite internegative but it was remarkable in the way it single handedly solved the edge and fine detail problems that plagued blue screen. It was so successful in fact that the process remained in popular use for almost 40 years. Developments like microprocessor controlled quad optical printers, employed by Richard Edlund for The Empire Strikes Back made the process faster and more accurate but the next big change to come would be in the form of digital. Quad Optical Printer at ILM used for “The Empire Strikes Back” 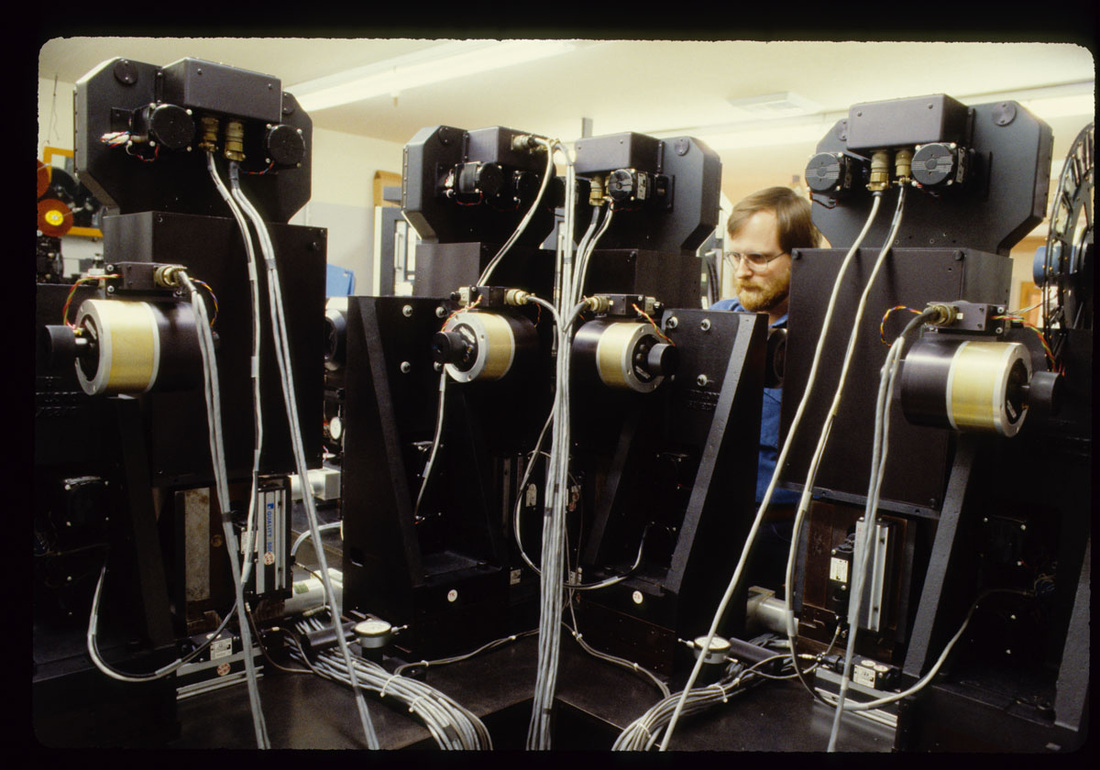 Digital Green Takes Over I have consciously avoided the the term “chroma key” as historically the term applied only to video systems only. That’s not the case anymore. In rudimentary video mixers, a keyer was a mathematical process that would make a range of colors in a video signal and make it transparent. This is, of course, a common effect that television newsrooms all over would use weather map special effects. Blue as a screen color was still predominate but green started to take over as films began getting the digital post production treatment in the late nineties. Why Green? Basically Green was easier and cheaper to light than blue, green registers brighter on electronic displays, worked well for outdoor keys (where the blue screen might match the sky) and the bold green color was less common in costumes than blue is. Bayer Pattern – the arrangement of Red, Green, and Blue photosites on many modern Digital Cameras. And now as digital camera are replacing film, many digital sensors use a Bayer Pattern which have twice the number of green photosites than red or blue to capture luminance. This makes modern digital cameras much more sensitive to the green part of the spectrum making pulling a matte from greenscreen a little easier. Blue is still commonly used as are other colors depending on the needs of the shot. So now with advanced software and motion controlled cameras, Chroma Key, a term that has grown now to encapsulate much more than it’s original video technique, can be used to insert backgrounds and set extensions in ways that Georges Milies and Norman Dawn could only dream of. There are cynics today that believe modern film is too reliant on CGI and that we should return to a simpler form of real filmmaking. But as I hope you learned, that era never existed – filmmakers from the very beginning have sought to push the medium with special effects. The undeniable truth about filmmaking is the only thing that matters is what’s on that screen. From Edwin S. Porter’s matted train station window to the modern action spectacle, it’s all about creating a window onto another world. A world where each of us can find our dreams our fears and ourselves. All these effects we have are just tools to help us get there.. And we have some fantastic tools, so use them, and make something great. ✧ʕ̢̣̣̣̣̩̩̩̩·͡˔·ོɁ̡̣̣̣̣̩̩̩̩✧ Original Source. Quizzes The Evolution of Greenscreen Compositing Quiz PERSONAL REVIEW It made me think about a video I’ve seen few months ago about the history of Compositing.
In the early age of the cinema, matte painting and what we defined later as being compositing was working very closely together. It’s easy to understand why we call glass painting this big painting made on glass that was directly put between the camera and the rest of the set. We didn’t any stage that could be called pre-compositing, at it was done live, and shot as it was. There was no post treatment, and if the time changed before the artist finished his matte painting, the painting and the set lighting were different, which was a problem… This great and legendary technique was glass-painting, not matte painting. Matte painting came later, when we started to use a cache which was basically a piece of black paper put in front of the camera in order to hide all the part of the set that we didn’t want to print on the film. Then, by projecting the opposite of this cache onto a big canvas, a matte painter was able to paint exactly what was missing to the film. We just had to shoot again, but only the part that were not impressed the first time, through another cache, and we had both the set and the matte painting of the same film. At this time, we had camera operator dedicated to this task, that were probably the first compositor in the history. Then came the use of the proper black and white matte. And this is the beginning of the compositing as we know it today. The evolution of all these techniques for matte painting followed the evolution of the use of matte in general in films. And it’s really interesting to see how we managed to assemble different sources together through the age. |
